
Folding Origami Peace Cranes
This publication is available upon request in alternate formats.
PDF Version
What is Origami?
Origami is the Japanese art of paper folding. The word Origami means “ori” (folding) and gami (paper).
Why fold Origami Peace Cranes?
Squeaker the pigeon folds paper cranes as a symbol of peace. Every year thousands of people around the world fold paper cranes as an expression of hope for a world at peace. They promote a world where people can live without fear.
What Paper Should I use?
You can use Origami paper. It:
- comes in a variety of colors, sizes and patterns.
- is thin, strong and folds well.
- is often colored or patterned on one side and plain on the other.
Or, you can use any paper you have, such as a page from a magazine, wrapping paper or paper from your notebook.
Just remember that the paper:
- must be a perfect square.
- should measure at least five inches square.
How to Share the Story of the Paper Peace Crane
- Make a garland of peace cranes by stringing them together. Hang them in your school, home or community centre.
- Ask your librarian to make a display of books related to peace cranes, such as Sadako and the Thousand Paper Cranes and other books about war, peace and animals in war.
- Bring your cranes to a nursing home or hospital. Don’t forget the instructions for folding the cranes! It’s a wonderful activity to share with others.
- Ask your local newspaper to publish a story about why you folded peace cranes and include a photograph of the people who made them.
- Make a paper crane ornament by adding a string.
- Wear a paper crane as a peace pin.
- Make a peace crane mobile. Hang several peace cranes from a hanger, then hang it from the ceiling.
- Give peace cranes to friends and Veterans. The gift of paper cranes is a gesture of peace, caring, devotion and love.
- Do some research on the Internet for information about the story of Sadako and the Thousand Paper Cranes and the Thousand Cranes Project. Share your findings with your family,community group or classroom.
How do I make peace cranes?
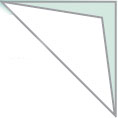
Step One
Fold paper diagonally to form a triangle. Be sure the points line up. Use your thumbnail to make all creases very sharp. Now, unfold the paper.

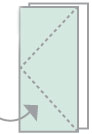
Step Two
Fold the paper diagonally in the opposite direction, forming a new triangle.
Unfold the paper and turn it over so the white side is up. The dotted lines in the diagram are creases you have already made.
Step Three
Fold the paper in half to the right to form a tall rectangle.
Unfold the paper.

Step Four
Fold the paper in half, bringing the bottom up to the top to form a wide rectangle.
Unfold the rectangle, but don’t flatten it out. Your paper will have the creases shown by the dotted lines.

Step Five
Bring all four corners of the paper together, one at a time. This will fold the paper into the flat square shown on the right. This square has an open end where all four corners of the paper come together. It also has two flaps on the right and two flaps on the left.

Step Six
Lift the upper right flap, and fold in the direction of the arrow. Crease along line a-c.
Step Seven
Lift the upper left flap and fold in the direction of the arrow. Crease along the line a-b.

Step Eight
Lift the paper at point d and fold down into the triangle b-a-c.
Crease along the line b-c. Undo the three folds you just made (steps 6, 7, and 8), and your paper will have the crease lines shown on the right.

Step Nine
Lift just the top layer of the paper at point a.
Think of this as opening a crane’s beak. Open it up and back to line b-c where the beak would hinge. Crease the line b-c inside the “beak.”
Press on points b and c to reverse the folds along lines a-b and a-c. The trick is to get the paper to lie flat in the long diamond shape. At first it will seem impossible, but with some patience you will get the hang of it!

Steps Ten - Thirteen
Turn the paper over. Repeat steps 6 to 9 on this side. When you have finished, your paper will look like a diamond with two “legs” at the bottom.
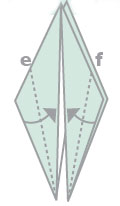
Steps Fourteen - Fifteen
Taper the diamond at its legs by folding the top layer of each side in the direction of the arrows along lines a-f and a-e so that they meet at the center line.
Steps Sixteen - Seventeen
Flip the paper over. Repeat steps 14 and 15 on this side to complete the tapering of the two legs.
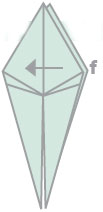
Step Eighteen
The paper has two skinny legs. Lift the right upper flap at point f and fold it over in the direction of the arrow—as if turning the page of a book. This is called a “book fold.”
Step Nineteen
Flip the entire piece over. Repeat this “book fold” (step 18) on this side. Be sure to fold over only the upper flap.
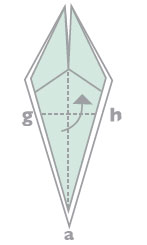
Step Twenty
Now imagine this image is what you would see if you were looking straight down at the top of a crane’s head. The two points at the top of the picture are the back of the crane’s head and its pointy beak is at the bottom. Open the upper layer of the beak at point a and crease it along line g-h so that the tip of the beak touches the back of its head (ouch!)
Turn the figure over. Repeat on this side so that all four points touch.
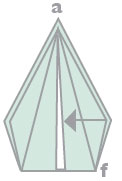
Step Twenty One
Lift the top layer on the right (at point f), and fold it in the direction of the arrow to the middle. Be sure to crease the fold. Flip the entire figure over. Repeat the “book fold” on this side.
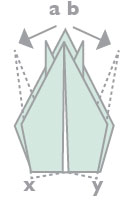
Step Twenty Two
There are two points, a and b, below the upper flap. Pull out each one as far as the dotted lines in the direction of the arrows. Press down along the base (at points x and y) to make them stay in place.

Step Twenty Three
Take the end of one of the points and bend it down to make the head of the crane. Using your thumbnail, reverse the crease in the head, and pinch it to form the beak. The other point becomes the tail. Gently pull out the wings and your peace crane is ready to fly!
- Date modified: