
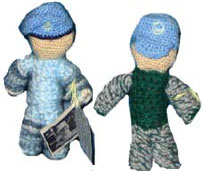
Izzy Doll Pattern

This publication is available upon request in alternate formats.
PDF Version
You Need
- Small quantities of sayelle, sports weight or similar weight yarn. (If using heavier yarn such as 4 ply, knit fewer rows.)
- 1 pair 3.00 mm (# 12) needles
- Polyester fiberfill for stuffing
- Embroidery floss for face
Steps
You can work in stocking stitch (knit one row, purl one row) throughout or you can knit every row for the pants and change to stocking stitch for the remaining rows.
Cast on 32 stitches
- Work 4 rows for feet in stocking stitch. Change colour of yarn.
- Work 14 to 16 rows for pants in stocking stitch or knit. Change colour of yarn.
- Work 12 to 14 rows for sweater in stocking stitch. Change colour of yarn.
- Work 8 rows for face in stocking stitch. Change colour of yarn.
Work the next 11 rows for hat as follows
- Rows 1 to 4: work evenly in stocking stitch.
- Row 5: decrease 5 stitches evenly across row: K3, K2tog; (K4, K2tog) 4 times. Knit to the end (27 stitches).
- Rows 6, 8, 10: purl.
- Row 7: decrease 5 stitches evenly across row: K2, K2tog; (K3, K2tog) 4 times. Knit to the end (22 stitches).
- Row 9: decrease 5 stitches evenly across row: (K2, K2tog) across the row (17 stitches)
- Row 11: (K1, K2tog) 9 times: K2tog.
- Draw yarn through remaining stitches.
Continue with face colour for these 11 rows if you want to make a hat separately (see instructions below) and sew it on afterwards. If you want to add hair, cut 10 cm (4”) lengths of yarn.
Attach hair to head as follows: with 2 strands together, fold in half to form a loop. Insert, crochet hook into a stitch on head, pull hair loop through stitch, then pull yarn ends through loop.
Fluff out hair and trim as desired.
To Finish
- Sew sides together to form a centre back seam.
- Stuff head. Weave a single strand of matching yarn across the first face row. Draw up to form neck and tie tightly.
- With matching yarn, define arms by sewing small backstitches through both layers from waist to 3 rows below neckline and then stuff.
- Define legs in same manner with small backstitches down the middle from bottom edge to just below waistline and then stuff. Sew up bottom edge. With matching yarn, weave a single strand around the waist and gather in slightly to form a waist. Repeat around the top row of the feet to form ankles.
- Using 3 strands of floss, embroider eyes and mouth on face.
Notices
You can also make the illusion of hands as follows:
- Knit 14 rows for pants.
- Next row: K9 stitches for pants, K3 in flesh tone (or whatever colour you are using for face), K8 for pants, K3 in flesh tone, K9 for pants.
- Next row: K8 for pants, P4 in flesh tone, K8 for pants, P4 in flesh tone, K8 for pants.
- Next row (changing to sweater colour), K8 for sweater, K4 in flesh tone, K8 for sweater, K4 in flesh tone, K8 for sweater.
- Next row: P8 for sweater, P4 in flesh tone, P8 for sweater, P4 in flesh tone, P8 for sweater.
- Continue stocking stitch for sweater for 12 more rows.
Let your talents and imagination create a unique and individual Izzy Doll. A little child somewhere around the world will love it.
(Finished height should be approximately 5 to 6 inches)
United Nation’s Peacekeeping Beret (blue) or Regimental Beret (dark green)
- Round 1: Using 3 mm hook and blue or green Astra weight yarn, chain 5 and join to form a circle.
- Round 2: 2 single crochet in each stitch (10 stiches).
- Round 3: 2 single crochet in each stitch (20 stiches).
- Round 4: Single crochet in next stitch twice; 2 single crochet in next stitch. Repeat around.
- Round 5: Single crochet in next stitch 3 times; 2 single crochet in next stitch. Repeat around
- Round 6: Single crochet in next stitch 4 times; 2 single crochet in next stitch. Repeat around.
- Round 7: Single crochet in next stitch 5 times; 2 single crochet in next stitch. Repeat around.
- Round 8: Single crochet in next stitch 6 times; 2 single crochet in next stitch. Repeat around.
- Round 9: Single crochet in each stitch (you should now have approx. 46 stitches)
Decreasing
- Round 10: Single crochet in next stitch 3 times; go into 4th stitch and bring up a loop, then into 5th stitch and bring up a loop, then draw yarn through all 3 loops. Repeat around. (This makes a decrease every 4-5 stitch).
- Round 11: Repeat round 10.
- Round 12: Single crochet in next stitch 4 times; go into 5th stitch and bring up a loop, then into 6th stitch and bring up a loop, then draw yarn through all 3 loops. Repeat around. (This makes a decrease every 5-7 stitch).
- Round 13: Change yarn to black and repeat round 12. Knot yarn. If making the blue beret, embroider the UN Crest on the front then attach hat to the head.
United Nations Crest:
Simply make a small white circle on front of hat using baby yarn or white embroidery thread. You can also add some gold leaves in the centre of the crest.
Head
- Rounds 1-3: Same as the peacekeeper’s hat.
- Round 4: Single crochet in each stitch around.
- Round 5: Single crochet in next 3 stitches, then 2 single crochet in next stitch. Repeat around.
- Round 6: Repeat row 5.
- Round 7: Single crochet in each stitch around.
- Round 8: Single crochet in next 3 stitches, decrease in stitches 4-5 (same as peacekeeper’s hat Round 10).
- Round 9: Single crochet in each stitch around.
- Round 10: Repeat round 8.
- Round 11: Single crochet in each stitch around.
- Round 12: Single crochet in each stitch around.
- Round 13: Repeat round 8.
- Round 14: Single crochet in each stitch around.
- Round 15: Repeat round 8.
Stuff head with polyfill. Close hole and attach head to body.
- Date modified: